Monday, June 25, 2012

I am the eggman, they are the eggmen. (coo coo g'coo)


Nothing like cooking to bring a family together. Either you love it and it is your “go to” place for relaxation, inspiration or just good old enjoyment or you love your other half’s “go to” place for relaxation, inspiration or just good old enjoyment and you can lick the spoon and eat the results…..
But, for me, I will admit getting Alice involved in the process gives the most rewards. Like all 11 year olds she is not the most responsive at the idea of peeling pots of potatoes or washing the dishes afterwards but put a bowl of mince, herbs and egg in front of her and it’s all hands in until burger / meatloaf / whatever is thoroughly squished, squelched and mashed into submission. Who needs a mixer?

This weekend we were making ravioli from scratch (post to follow) and I was showing Alice how to beat an egg with a fork and I remembered that Sinéad and Alice made little eggmen last Easter to decorate the table.

And so, for no other reason than a bit of my own nostalgia, may I present to you “The Eggmen” by Alice….

Sunday, June 24, 2012

Only here for the Krack(en)


Some things just have to be done. Don’t think, don’t plan, just do. Your first kiss, your first parachute jump, the first time you dissect a squid….. If you spend time discussing, analysing and justifying some things, you will never do them. I discovered Calamari in Italy in 1992. In fairness, looking back they weren’t the best examples of calamari – they were on the rubbery side and were quite oily. (I also didn’t know they were squid at the time or I probably wouldn’t have eaten them – I thought they were some kind of Italian onion rings…oh the innocence..). But I did eat them and have eaten them ever since. But as for cooking these strange and somewhat frightening cephalopods, where do you start?
So when we saw the Good Eats “Squid Pro Quo” episode, Alice (in a mixture of awe and horror - as only an 11 year old can simultaneously display) decided that this was something that had to be done. Off to the fishmongers did we trot and returned did we with a creature of sac and tentacles and eyeballs and – well, you get the picture. Seriously though, I ask you, who first looked at these and thought “mmm, those look yummy”?... I mean look at them….
For the sake of those who may be squeamish, I will refer you to “Squid Pro Quo” for full instructions on how to slice and dice but suffice to say, after a few minutes, a full set of usable parts lay before us (and it wasn’t that hard either).
Some more slicing to create the rings and separate the tentacles and a quick dip in the batter and we are ready to fry.
We decided, as the oil was on anyway, to serve them with some chips (fries for our U.S. friends) and a few minutes later a platter of deliciousness was placed on the dining table. A quick sprinkling of salt and some sweet Thai chilli dipping sauce and dinner is served. The best part was watching Alice making a point of eating the tentacles first, to show “that she could”…
I would fully recommend that you give it a go, particularly if you cook with your kids, but would also say that you can buy packets of frozen mantles (the body of the squid from which you cut the rings) if you would prefer not to go through the hassle of dismembering a fresh one. These will do the same job. Don’t think, don’t plan, just do….

Monday, June 11, 2012

Meat me in St. Louis


Consider your final meal….. the last tasty morsel of deliciousness that will ever tingle your taste buds and fire those sensory neurons in your brain – how important would it be to get it just right? Not that I would want it to be anytime soon but I have given this a little thought. For me, the ideal menu would start with a fresh chicken liver pate with thinly sliced onions on a crisp melba toast, finish off with a baked sour cream cheesecake and, in between, tender, juicy and succulent barbequed pork ribs, lightly smoked and falling off the bone. Armed with this I would be well prepared for the eternal nap on the sofa in front of the celestial T.V.


But what constitutes good pork ribs? Sadly, in Ireland, a decent rib I have yet to experience. I have tried many attempts in various restaurants but invariably they fall short by being either chewy and tough or dry and overcooked. A good rib is a skill only achieved by practice and heat control and the right seasonings. Having a good butcher on standby is also a great help.


This brings me nicely onto the subject of today’s post – the wondrousness of the St. Louis Cut Pork Rib.

In the US there are two types of ribs – Baby Back and St. Louis. In short, the baby backs are the part of the rib nearest the spine. These are tender but not very meaty and are what are normally sold in butcheries in Ireland. The St. Louis cut is after the baby backs and before the rib tips. These ribs are much meatier but tougher and that requires some more attention during the cooking process – but the final results are so much better in both flavours and a satisfying “bite”.

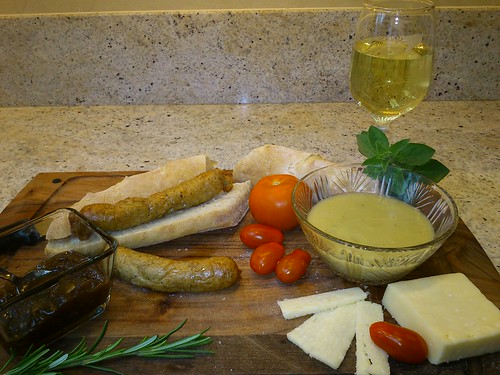
For the last year I have tried to find a butcher who will take the time to understand my requirements and again I must refer to Brendan Keenan from Keenan & Kennedy Butchers, http://www.keenanandkennedy.com/. Brendan took the time to look up St. Louis Ribs on the internet and sold me two perfectly cut racks of meaty deliciousness. (and no, he doesn’t pay me or reduce the bill for saying that….)

There are four steps to the perfect rib:
1) Preparation
2) Flavouring (The Dry Rub)
3) Cooking (The Braising Liquid)
4) Finishing (The Sauce)

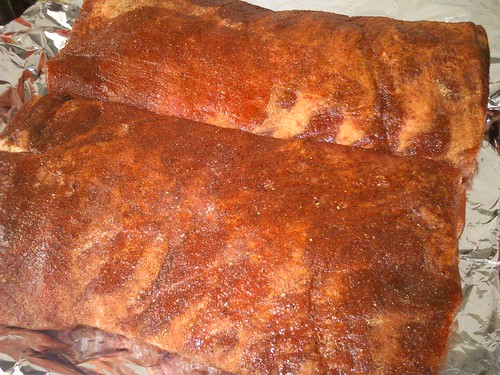
The Piggly Wiggly Ribs

The Rub
5 Tbls Light Brown Sugar
1 Tbls Kosher (coarse) Salt
1 Tbls Chipotle Chilli powder (or whatever chilli powder you have - measure according to heat..)
1 Tbls Smoked Paprika
1Tsp Dry English Mustard
1 Tsp Garlic Powder
1 Tsp Onion Powder
1 Tsp Old Bay seasoning (optional and only if you can get it…seriously Irish retailers – Old Bay and Kosher Salt – Why does no-one here sell these??)
½ Tsp Black Pepper

Mix well together and put in some form of shaker (I use a magic bullet – got one some years ago and it’s the only thing it’s good at….)

The Braising Liquid (enough for two racks – halve if only doing one)
1 Cup (250 ml) Apple Juice
2 Tbls Apple Cider Vinegar
1 Tbls Worcester Sauce
1 Tbls Honey

Mix together

The Barbeque Sauce
½ Cup (125 ml) Apple Juice
2 Tbls Apple Cider Vinegar
2 Tbls Tomato Puree
2 Tbls Irish Whiskey (or Bourbon) (or optional)
1 Tbls Soy Sauce
1 Tbls Worcester Sauce
2 Tsp Molasses (Black Treacle)
2 Tsp Light Brown Sugar
1 Tsp Dry Mustard
½ Tsp Garlic Powder
½ Tsp Onion Powder
½ Tsp Chipotle Powder
½ Tsp Kosher Salt

Mix together in a heavy bottomed pan over a low to medium heat. Bring to a simmer and reduce by half (about 10 minutes) Let cool – I do this part after the ribs are first put on. (Note – reserve some sauce for dipping etc before you use it on the ribs)

Preparation - Firstly inspect your ribs (same for the baby backs – don’t miss this step). There will be a membrane on the inside (bony side). Push the back of a teaspoon or blunt knife under the membrane and work it until you can get a finger in under the skin. Then pull the membrane and it should pull away cleanly from the meat.

Flavouring – sprinkle the dry rub liberally on both sides of the ribs. Pack into a large Ziploc bag (I get mine from Ikea – the largest bags are ideal) and press as much air out as possible. Alternatively, wrap well in plastic wrap. Store overnight in the fridge. Take out of the fridge ½ hour before you go to cook them next day.

Cooking – The secret to good St. Louis Ribs is to cook low and slow. As this is Ireland, and most barbeques here are basic models (compared to the American models), it tends to be difficult to keep the temperatures consistent over long periods. This means that the best BBQ ribs are actually cooked in the oven (please don’t stone me just yet….)

Heat oven to 250F degrees. Place the ribs on a sheet of aluminium foil which has been doubled over (the final sheet size must be large enough to wrap the ribs in a parcel). Bring the two side edges to the top and seal tightly. Seal one end tightly. In the other end pour in half the liquid (if doing two racks) in each of the parcels and seal tightly. Place onto trays and place on the oven for 3 hours. (less if making baby back ribs say 2 ½ hours). After three hours test the “doneness” by twisting a middle bone – If it pulls away from the meat you are ready to finish - if not give it another half hour.

Finishing - If finishing on a BBQ light it ahead of the estimated oven finish time according to your BBQs instructions. If it’s raining, snowing etc (as it invariably is in Ireland) finishing in the broiler (or grill as it is in Ireland) will also work – just be sure to move the rack down from the elements. Add smoke to the BBQ by soaking hard wood chips for half an hour beforehand, wrapping in foil, piercing the foil a few times and placing on the hot charcoals or gas covers (not the elements directly). Place the ribs onto the grill rack (bony side down) and baste with the sauce. Cover and let the smoke do its work – note this will be enough to give a smoky taste to the ribs but will not give the pink smoke rings that BBQers crave in competition – this is caused by the meat being prepared for hours in a smoker which is advanced BBQ juju - trust me, we haven’t got to that level yet – you’ve only just learned about St. Louis Ribs for God’s sake…..

Keep basting every three to four minutes or so for 10 to 15 minutes (we are just looking to caramelise the sauce a bit) then let the ribs rest for 5 minutes.

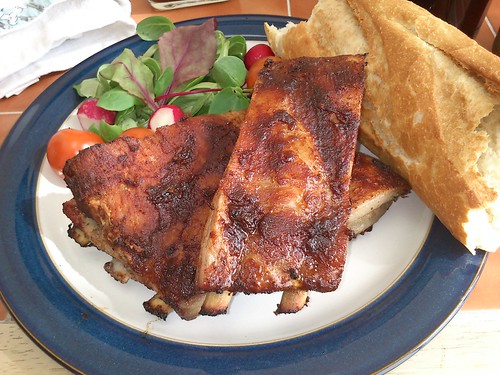
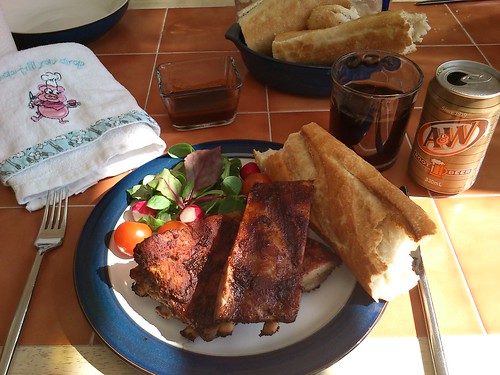
Slice down between the bones to present for parties or, as I do, grab one full rack and run off into a corner, wide eyed and snarling at anyone who tries to take them off you as you suck the meat off the bones oblivious to the juice running down your chin whilst chanting “precioussss, my preciousss”…..oh – probably too much information….

Monday, June 4, 2012

Laws and Sausages....

To quote Leo McGarry from TVs The West Wing (the late but great John Spencer) "There are two things in the world you never want to let people see how you make 'em - laws and sausages". I always had a hankering to make sausages - once you have the basic recipe there is a world of flavours out there to combine and mix until you have your own special signature sausage that you can roll out at family get-togethers and barbeques to oohhs and aahhs from the appreciative audience.
But where to start? I have read many tomes and guides into the strange world of fat and innards and it is a slightly scary place. I started by watching Season 7 Ep 06 of Good Eats (A Beautiful Grind) and this gave me a number of very good pointers not least being - Find a good butcher and get to know him. Having a person that is willing to take time to understand what you need and then provide you with quality product is half the battle.

Remember the Pink Floyd video?
Thankfully I happened upon Brendan Keenan from Keenan & Kennedy Butchers, purveyors of all things porky: http://www.keenanandkennedy.com/. Brendan took time out of a busy day to actually bring me behind the shop counter into the manufacturing plant where they churn out pounds of award winning specialty sausages and puddings. He was happy to impart the knowledge of a lifetime to a complete beginner and was able to supply me with the pork belly, back fat, proper rusk for the filler and, most importantly, the natural casings (we won’t dwell too much on that……). He also advised me on some of the techniques and pitfalls of home sausage making and wished me luck as I happily left this shop of wonders laden down with a box of fresh pig bits.

Real Kosher Salt - only used for special occasions as we can't get this in Ireland
First to Good Eats again – We watched the episode noting the way AB made his sausages and compared this to Brendan Keenan’s advice – both the same, so far so good…. AB has a KitchenAid with the correct attachments as do I. All the meat, bowls and utensils are chilled…check. Ingredients, apart from the mains mentioned above we went for sage, marjoram and thyme with salt and fresh crack black pepper – traditional and safe basic breakfast links recipe.
We started with the casings – rinse thoroughly and, by running water gently through them check for any bursts or tears then thread onto the stuffing attachment. Thankfully Sinéad volunteered for this job as it really is fiddly. I started the first grind, pushing the pork belly and back fat, cut into strips, through the grinder. This went smoothly and, once finished, added the rusk, water and seasonings to the mix and combined by hand. Refrigerate for an hour.

After the hour was up (secret is to keep the mixture cold at all times) the second grind also passed without incident. We refrigerated for a further half hour and then prepared for the stuffing.
What appeared easy on Good Eats was not what we experienced. OK, I understand it was our first time but feeding the mixture into the attachment was exceptionally hard. No matter how we loaded the hopper, there were still pockets of air and the auger in the stuffer refused to pull the mixture into the stuffing tube. We only managed to stuff the sausages by the application of a substantial amount of force on the plunger. I understand from speaking to Brendan afterwards that the best machine for home sausage making is an old fashioned hand crank machine as 1) it doesn’t heat up the meat as was happening in the KitchenAid and 2) the speed can be controlled better helping to draw the meat into the stuffer.
Despite this, however, we did get sausages. A lot of sausages. About five and a half pounds of sausages. And, although they weren’t as firm as we would have hoped, they did taste good. And combined with some homemade bread and a red caramelised onion relish and Sinéad’s awesome potato and leek soup we deemed the day a success. Then, because this took all day and we were wrecked, we went to bed…..early.