Sunday, June 13, 2010

Off with her egg.....

It's been a long month and a half........ Between work and family illnesses my wife and I have been run ragged trying to keep up over the last six weeks, living off ready meals and takeouts is not a good recipe for life.  At least now, it is starting to settle back down and I can look forward to a decent home cooked square meal.
In the middle of this I attended a conference in the UK.  As part of the weeks agenda, we attended the wonderful Hever Castle, home to the unfortunate Anne Boleyn - second wife to King Henry the Eighth and most notable for being 5'3" just before her death but only 4'8" after......

During the Castle evening, we were treated to a fantastic and interesting tour and to a brilliant meal.
The starter course was something I haven't had in years - Cheese, Leek and Pea Egg Tarts.
A simple yet delicious start to the evening,  I decided I had to try them.

Egg Tart with Leek and Cheese (didn't have peas on the day!)

Pastry
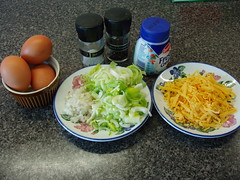
200g (3/4 cup) All Purpose or Plain Flour
1 Tsp Baking Powder
1 Tsp Salt
50g (2 Tbls) Lard or Shortening
50g (2 Tbls) Butter
3 to 4 Tbls Cold Water
Sieve the Flour, Baking Powder and Salt together
Using your fingertips, lightly work in the butter and lard until it resembles small breadcrumbs
Make a well in the centre and add the cold water one spoonful at a time pulling the mixture together until it forms a ball. (amount of water needed will differ dependent on humidity, heat in kitchen etc) 
When the mixture comes together as one , wrap in plastic wrap and leave in the fridge for 20 to 30 minutes.

To Blind Bake the Pastry
Preheat the oven to 200 Centigrade
After the pastry has rested, roll out and cut into rounds to fit into a muffin tin (or use a large pie dish if preferred)
Place into the muffin tin (or pie dish) and cover each of the pastry cases with a piece of parchment paper.
Onto the parchment paper, place a layer of Ceramic Baking Beads or weight of your choice (I use a uncooked rice or lentils poured into the parchment - these can be used again but be sure that they are only used for this purpose and not for general eating...) 
These weights allow for the pastry to be cooked just enough to stop the liquid filling leaking out and also stops the pastry rising.
Cook at 200 Centigrade for 10 minutes and remove from the oven and allow to cool while we prepare the filling. (removing the weights and parchment carefully - they're hot)
Tart Filling
One Shallot (or a small onion) finely chopped
One Leek finely chopped
75 mls 1/2 Cup cream
100g 1/2 Cup grated Cheddar (or cheese of choice)
3 eggs lightly beaten
Pinch Salt
Few good grinds Black Pepper (to taste)
Pinch of Nutmeg (and/or cayenne pepper optional)
  
Over a medium heat, fry the shallots and leeks in a little oil until soft (about 10 minutes)
Turn the heat to low and pour in the cream - let the cream reduce for about 5 minutes.
Strain the Leeks (reserving the cream) and spoon a small amount of the mixture in the bottom of the pie casings and cover with a small pinch of the grated cheese.
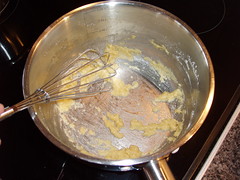
Add the salt, pepper and nutmeg to the eggs and beat lightly. Pour a small amount of the warm cream into the eggs whisking whilst doing so (this tempers the eggs - IE raises the eggs temperature slightly and saves you ending up with scrambled eggs) 
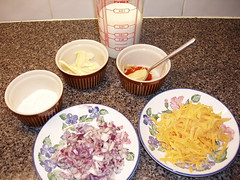
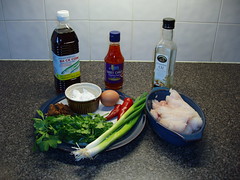
After a few seconds add the remaining cream continuing to whisk.
Pour the mixture into the cases, top with cheese and put into the oven at 200 Centigrade for 12 to 15 minutes.
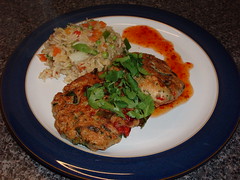
The eggs should be set and golden in colour

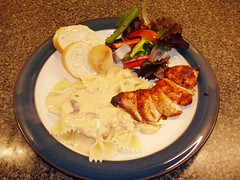
Serve with a salad either hot or cold and spare a thought for poor Anne Boleyn.......

Sunday, May 2, 2010

First Sunny Day of Summer......

It's amazing that a bit of good weather can suddenly bring out the Neanderthal in all of us - "It's sunny - let's through large amounts of red meat onto an open fire and eat outside with the flies and things...."
But, not being immune myself, we decided to venture outdoors last weekend and fire up the pit - cows and chickens everywhere, beware.....

The menu, in fairness, wasn't overly adventurous - Kofta Burgers with Portabello Mushroom and Fried Chicken with Animal Ice-Cream for dessert. 

Kofta Burgers
Some years ago we got tired with the same old burgers - I've always made my own (mix mince beef, herbs and seasoning of choice, breadcrumbs and egg to bind and grill/fry as needed) but this got just plain boring.  Whilst making a recipe for Indian Koftas (meatballs in a spicy sauce) I suddenly realised that I didn't have all the ingredients for the sauce.  So, left with spiced meat balls and no dinner, I did what any self respecting man would do - flatten, grill and cover with cheese and ketchup......the rest, as they say, is history.
P1010074

Ingredients:

One Pound of Minced / Ground Beef

One Large Onion
One or Two Chillies
2 Cloves Garlic (optional)

1 and 1/2 Tsp Ground Coriander
1 Tsp Cumin
1 Tsp Garam Masala
1/2 Tsp Chili Powder
1/2 Tsp Salt
1/2 Tsp Ground Black Pepper
P1010077
Method
Chop the onion, the deseeded chillies and garlic together
Mix all the ingredients either by hand or in a food processor (I use the processor as it gives a more "Pattie" like consistency - just ensure that you don't over process the mix as will break down the meat fibres too much - using smaller batches, 4 to 5 quick pulses should be enough)

P1010085Cooking
Grill or Fry (or BBQ) until cooked through - this varies depending on the thickness of the meat but to be sure, the internal temperature should be 165 degrees Fahrenheit (seriously, invest in a meat thermometer - it's a lifesaver)
P1010083

Garnish as you will and enjoy!

Portabello Mushrooms
These were cooked at the edge of the BBQ for 5 mins each side and were covered in Butter, Cheese and a clove of chopped Garlic melted in a ramekin on the BBQ

Fried Chicken
Pure Soul Food is what this is - now I have found this I find I regret not having been born in Georgia or Louisiana so I could say I was brought up on Fried Chicken.

Ingredients
Chicken Pieces (with Skin on) - Leg, Thigh, Brest - whatever...
1 Tbs Paprika
P1010075
1 Tsp Ground Cumin
1 Tsp Chili Powder (optional)
1 Tbs Salt
2 Tsp Garlic Powder
Plain flour for coating.
Vegetable Fat/Shortening for frying


P1010079

Method
1) Mix all the ingredients in a bowl 2) For frying, I have been using a 10 inch cast iron fry pan
Into this I put enough Vegetable Fat to come halfway up the edge. 
P10100763) Bring the fat up to 325 degrees Fahrenheit (preferably use a fry/candy thermometer to ensure that the fat is at the right temperature and is maintained there. (of course, never leave hot fat unattended and never have young children around when cooking fat - a good fire blanket would be good too just in case...)
4) Liberally coat the chicken in the flour/spice mix and shake off the excess flour - leave to one side for a minute or two before putting into the fat
5) Place the chicken into the fat (325 degrees - remember...) laying it away from you (in case of splatters) ideally the fat should come halfway up the pieces
6) Leave alone for 10 to 12 minutes - seriously, It doesn't need to be moved or jiggles around. When that side is golden brown turn over and cook the other side for a further 10 minutes (again, internal temperature should be around 165 F) Note - there may be darker areas where the skin touches the pan but that's OK..
7) Take out and drain on a wire rack over kitchen towels - Leave to rest for 15 or so minutes before serving (Cover in foil loosely if the ambient temperature in the room is cool/cold but don't
P1010088Animal Ice-Cream
Finished off with some Hagen-Daz Ice-cream with Cadburys Chocolate Animals - Seriously, what did you think it was..?

So, as the light faded on the first (and possibly only) day of an Irish summer, we sat back, licked our fingers, took a sip from our glass and sent in our daughter to wash the dishes....aahhh, life is hard..!


Wednesday, March 31, 2010

Pasta day...

Hi - I had a few comments on my first post and I'd like to say thanks for reading - I didn't think anyone would be bothered to tell the truth....So - now the pressure is on. 

It's been a busy week and, even though I've been off work for a few days, I haven't had much time to relax - holidays seem to be the only time we can get work done around the house as we both work (I've always wondered how other people do it?) and my daughter is looking to be entertained constantly.

So for last nights dinner I went with a simple pasta disk which only took 20 minutes to make (with a marinade 30 minutes beforehand)

BBQ Chicken with Pasta in a White Cheese Sauce (without the BBQ unfortunately)
This should probably have a better name but that's life......I should point out at this stage that the BBQ sauce came out of a bottle - time isn't always a friend.  This blog is more for the quick, simple and tasty Pasta Sauce, perfect for a weekday dinner - I promise I will do proper BBQ during the summer - it's one of my personal favorite ways of cooking

P10100091)
Chicken - I marinated 2 chicken breasts in "Newmans Own Sticky Rib Sauce" for 30 minutes and then grilled for 15 minutes while making the pasta (all the time basting the chicken with the rib sauce)

Pasta -  Cook your favorite Pasta according to instructions


P1010005


2) Ingredients for the Pasta Sauce
1/2 oz Butter
1/2 oz Flour
300ml Milk (I use low-fat 2%)
1 small to medium Red Onion (finely diced)
1 tsp Dijon Mustard
1/2 tsp Paprika
1oz Cheese grated (I use Mature/Sharp Cheddar)
Pinch of Salt and a few twists of fresh ground Black Pepper


P10100083) Making the sauce
Before you begin, heat a pan to medium and fry off the onions in a little oil for 5 minutes - This can be done beforehand but I would tend to start this when I start the Roux.

Now, first you need to make a Roux. This seems to frighten people but shouldn't - it's very simple and forms the basis of a number of classic sauces. 

a) Melt all the butter over a medium heat in a heavy bottom saucepan (a heavy bottom helps spread and maintain a constant heat and helps to prevent sticking and burning)
b) when the butter is melted add the flour, a heaped teaspoon at a time, whisking to incorporate all the flour before adding the next teaspoon - this needs to be done quite rapidly. 
c) when all the flour is incorporated, fry for 1 minute whisking continously (see above) - don't miss out on this step or the sauce will taste of raw flour - congratulations, you have just made a Roux.......

Once the Roux is made, start adding the milk a little at a time, whisking throughout to ensure no lumps (it may start a little lumpy but these will work out)
Add the Dijon Mustard and Paprika along with the salt and pepper to the sauce and continue to whisk.  At first it will be quite liquid but as the sauce heats up you will start to notice it begin to thicken. 

At the point you begin to notice it thicken there is only three or so minute to go - the sauce thickens much faster at this stage
The cheese gets added just before serving - add in in small amounts and stir for a few seconds whilst it melts.  You may not meed the full amount depending on the type of cheese used and it's strength so add to taste - Note that the cheese also adds to the thickening process.

Pour over the drained Pasta and serve with the Chicken.
P1010010
I added a salad and french bread for texture.


The Basic White Sauce is Butter, Flour, Milk and Pepper/Salt - This is a great base to experiment with, be it Curry Powder and Coriander for an Indian twist, Fresh Herbs and Scallions/Spring onions or Shallots or Cayenne Pepper, Red Bell Pepper and White Onion for a Southern Feel.

Mixing the sauce with leftover Turkey and Ham can be used to fill Vol au Vent cases which served with rice makes a great way to use leftovers.  Look up white roux sauces for inspiration and have a go - let me know if you get any great mixes and I'll include them here.

'till next time

The Old Fella

Sunday, March 28, 2010

First Ever Blog

For years now I've been looking at cookery programs and reading books in an attempt to better my skills and abilities. Until recently, I have hardly been inspired by the pompous "gourmet" food I saw - does anybody actually make this type of food for daily meals?


Recently in America I happened upon a Food Network program called "Good Eats" hosted by Chef Alton Brown. Up until now I have happily disregarded US cookery instructions as they invariably list ingredients where one is always "add a packet of .... or "mix with a can of...." - rarely do I see American magazines, books or shows actually make a meal fully and completely from scratch.

But Alton changes that - the "Good Eats" program (for those who aren't familiar with it) picks a different food item each week (Steak, Potato, Duck, chillies etc) and not only shows different ways to prepare the item but gives the science behind it - how it cooks, why it blends with other ingredients and so on but always maintains a light hearted and funny presentation style.

IMHO one of the best family shows on TV and should be compulsory viewing for all teenagers in school. Please please show this on Irish TV.........

My wife bought me "Good Eats - The Early Years" for Christmas and, in short, Alton has actually inspired me to start cooking again - If he ever reads this - Alton, thanks and keep up the good work!!

So, I decided to write this blog to:

1) Encourage myself to start cooking again
2) Try new and different dishes
3) Prove to myself that everyday cooking can be tasty and healthy if you know what goes into your food and how to prepare it.


First on the agenda was Thai Fishcakes which my wife asked for as a special request - so, not being a good idea to deny a wife's special request, I made these last night....

Thai Fishcakes with a Thai style Basmati rice
Despite what I said above, this recipe is quite complex but, if you prepare in advance, it doesn't take much time or effort.

Attack the meal in three stages:

1) Red Curry Paste
This form the basic flavour for the dish and can also be used to make Thai Red Curry (which is equally as good as any you can get from a Thai Restaurant) - I'll do this another time. This is my own recipe which I tweeked from a class in Asian cooking I did with my sister last year....
Ingredients
8 Long Red Dried Chillies, deseeded and chopped
P10109301 tsp Coriander Seed
1 tsp Ground Coriander
1/2 tsp Cumin Seed
1 tsp ground white pepper
2 Cloves Crushed Garlic
2 Stalks Lemongrass (chopped)
1 tsp Kaffir Lime Leaves (chopped)
2cm Fresh Ginger peeled and chopped
1 or 2 tsp Shrimp Paste (to taste - some people find it quite strong)
1 tsp Salt

Using a mortar and pestle - grind all the ingrediants into a thick paste (I used a Magic Bullet blender...)

Note - this can be made up in advance and refrigerated or frozen until needed. It makes about twice the amount needed for the fishcakes.

2) Thai Fishcakes
I picked the recipe itself from Here


Raw Mix
P1010933


P1010934Finished Product


3) Thai Style Basmati Rice
This is a mix of my own which tends to go down well at home. 

1 Cup Basmati Rice 
2 tbls vegetable oil
1 large Onion fine chopped
2 cloves chopped Garlic
1 Cup Chicken Stock
1oz Coconut Cream liquified in 1/2 Cup water
1 sliced Red Chilli
1 tsp Red Curry Paste
2 Spring Onions chopped
1 large Carrot chopped into small pieces
1/2 Cup frozen peas
1 tsp Salt
1 to 1.5 pintes of water

Soak the rice for 15 minutes in cold water
On a medium hot frying pan, fry the onions for 2-3 minutes until they begin to sweat
Add the Garlic, Salt and Red Curry Paste and fry for a further minute
Drain the rice and add to the Frying Pan - mix well to ensure the mix coats the rice.
P1010936Add the Chicken Stock and the Coconut Cream, Spring Onion, Carrot and Peas and mix together
Add enough water to cover and come about 1/4 inch above the rice in the pan
Cover and lower the heat to low for about 12 to 15 minutes until the rice is tender

Overall, they were good and tasty and I would make them again but next time I feel I would add something else to the to break up the texture which I felt was a bit too chewy - maybe rice or potato would help.  I'll try them again sometime and update this when I do.

Let me know if you try any of these recipies and any thoughts or words of wisdom are appreciated.